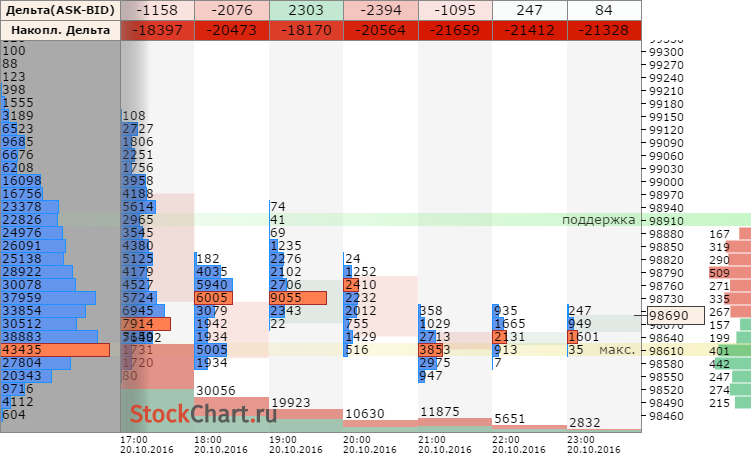

 | | | |||||||||||
|
|
||||||||||||
| | | |||||||||||||||
|
|
||||||||||||||||


Техническая поддержка
ONLINE
| | | |||||||||||||||||
|
|
||||||||||||||||||
How to host a sandboxed web browser with docker and Proxmox
ruticker 08.03.2025 21:04:58 Recognized text from YouScriptor channel virtualize everything
Recognized from a YouTube video by YouScriptor.com, For more details, follow the link How to host a sandboxed web browser with docker and Proxmox
```markdown Okay, well, I was so excited about this video last night that I actually tried to create it. That didn't end up working out well; I was too tired and kept making numerous mistakes, and really was unable to make anything that was usable. This morning, I'm going to refilm this process. But the short story is, I was at work about two or three years ago, somewhere in that range, and I saw a video on an isolated or sandbox web browser that was run on Docker. Now, I didn't have much interest in Docker, and I don't know if I didn't save it or whatever. Well, when I got home after thinking all day about it and went to actually watch the video and kind of learn about it, I had intentions of trying to use whatever software was inside of Docker into a container. I could no longer find that video, and time to time, the thought would actually pop back into my head, and I'd search for the video on the internet, but I just wasn't finding it. So with that, I would move on and go on to some other project and kind of let the thought drift away. Well, after leaving my last job and working more on doing web development now, and taking classes about web development, and really having more time to even focus on virtualizing everything, I got searching again yesterday. Well, I think it was Saturday, actually. Today is Tuesday, and so I got searching, and I actually found some information. I ended up finding it on Docker Hub, of all places, which actually kind of makes sense because that's where people publish this stuff. Now, I've been doing a lot more with Docker and feel a little bit more comfortable with it. I don't necessarily like pre-built things like this, and I like things that I understand at least a little bit more than this particular build. But it's really well documented on GitHub, and I got to the point that I felt fairly comfortable with this. After kind of discovering Chasm and looking into everything about Chasm, I started finding some pretty well-known influencers like Nova Spirit Attack that were covering Chasm, but I didn't really feel they covered it in necessarily a way that I would have liked it covered. So I thought I would do a video on it anyway. As far as Chasm, it kind of splits out into a couple of different ways. They have some Docker images that can be directly deployed if you want Firefox, Chrome, Chromium, Tor Browser, Edge, inside of a Docker container, and they can be self-deployed. Then Chasm kind of has an operating system, and I'm actually going to show you both setups here on Proxmox. But what we're going to do today is the web browser setup, and I'm going to show you how to set up a container inside of Proxmox that is going to handle Docker. Then we're going to install Docker, and we're going to install Docker Compose. Then we're going to go off and actually make the Docker Compose file that's going to pull down all of the different images and start them. We're also going to make an Nginx server that's going to just give us some notes and information about our setup. So in two months from now, when we're doing web development or whatever—I do mine more frequently, but I tend to jump around a lot depending on what project I'm working on at the time—when I come back to it and fire this container up, I have some idea of how to use it. Because although it's a tool and it's going to be a great tool, I don't necessarily feel it's fully refined as much as it should be, and maybe that's kind of on me for just wanting to work with it and use it and share it. It definitely could use some tweaking, and I should maybe do some research into that, but that'll be a later video if I get there. I kind of just want to work with it, and I want to share it with you guys because I'm excited about finally being able to test websites in multiple web browsers without having them installed on my personal computer. My personal computer, since I ventured down this endeavor—first leaving my university job a year ago and then leaving my what was supposed to be part-time position that really turned into a 60-hour-a-week position and a lot of stress—to really focus on what I wanted, which was developing my own business, except for the property rental thing that you've heard me talk about, but developing my own IT business and really developing out virtualizing everything more. I kind of really like doing these tutorials; I like teaching. It's something I much enjoy and want to focus more on. So with that, let's get over to the desktop and start creating a container and see where we can go from there. As I switch my screen recorder to the desktop, you can see that I have a window here, and I have Proxmox running. Now, unfortunately, I have a hard time kind of getting Proxmox any bigger than this as far as you guys can see with my browser. I guess if I use Chrome, I could use the control and the mouse wheel to kind of zoom in on it, but that doesn't seem to work with Brave. I might have just been missing a setting that I'm not seeing. But anyways, I find that at least when I'm editing my videos, I feel they're easier to follow if we can see the mouse editor. So I'm not going to go set up my screen recorder like I have in the past to enlarge this screen. I'm going to walk you through it here because I feel it's actually easier. So here, we're going to go up to this top corner where my mouse pointer is moving, and we're going to click **Create CT**. When we click **Create CT**, we're going to bring up this window. Now, one thing I want to show you ahead of time, and I'm hoping you guys already know this, and we have discussed it in numerous videos: containers are well, containers, and VMs are both going to need an image file of some sort in order to work. Now, the fastest and easiest way to get a container image file is to click on your local LVM driver, rather your local drive, and this is where you store most of your ISOs and your images and whatnot. ISOs are going to be basically your install files like that you would burn a DVD or a flash drive for. For a VMs container, templates are going to be your container image files. So you're going to click on the CT templates here, and then you're going to hit **Templates** right here. When you click **Templates**, it's actually going to give you a spit out of all of the different templates that are easily available on Proxmox. Now, there are some other places we can get images, and we can actually even make our own templates with some of the LXC tools, with varying success. I've had some success from time to time making my own and some success not so. Although we use LXC as part of Proxmox, the LXC commands aren't available to us, so we can't do certain things that we would do. It's somewhat of a modified version from my understanding, so it's best to usually use the Proxmox images available and then use cloning and templating through the web browser to make a clone or a template of an image that we can deploy. It just seems to work better. But anyways, if I wanted to say have Ubuntu 22.10, which is what we'll be using today, I'd click there and then I'd click **Download**, and that would download onto my server, and it would show up right here in my case. So now we have that, we'll go **Create CT**, and we'll give it a name. We can call this **Web Browser**; sounds good. And we've got to give it a password. Now, this password is going to be for the root user, and we'll talk a little bit more about that here in a minute. I'm assuming if you're coming to this tutorial, you might know, but I'm sorry if you do know; go ahead and skip ahead. Once we're done covering this, we'll get into the more nitty-gritty after we install Docker and Docker Compose for those people that are coming new here and haven't done these projects. So, anyways, we've given it a name and given it a password, and now we need to select that template, and we're storing the template here in local. Now, just so you know, Proxmox by default partitions our drive into two partitions: our LVM drive, which is where our containers and our ISOs or our VMs all live, and all the storage for them live, and then our normal drive called local. That's where the operating system and some of these images live that we're going to work with. But you can also add other storages from NAS and other things like that, depending on how your particular data center is set up. Proxmox was originally designed to be a data center software, but it's very much become a hobbyist software. So, we're going to click on **Templates**, and we're going to select our Ubuntu template again, and we're going to hit **Next**. Eight gigs has been fine, so we'll hit **Next**, but we do want to give this some cores. I have four cores, so I could give it three and keep one available for my operating system. I've gotten some flack, although I've never personally experienced audience performance degradation that was noticeable to me or even failure of software. I've gotten flack from people that are a little bit more knowledgeable about computer science than I am, like the actual creation of how cores and everything work. They say it needs to be balanced. Now, I've never officially read any documentation on that, so at this time, it's hearsay. But we're going to select two; more cores are better for this. We're going to run a lot of fairly heavy software when you see what's going on. So essentially, we're going to have a web browser inside of a web browser, so we're going to use our web browser to communicate with different web browsers to be able to load a web page and test things. So having a little bit of memory and CPU power is good. So anyways, we're giving it two cores of CPU, and they suggest at least two gigs. I'm personally just going to click on this button until I get over three grand, and I know that's not three gigs; it's three gigs is somewhat higher; it's a multiple of a thousand twenty-four. But I'm just pressing that button until I get up over three thousand just so I have enough resources here. The awesome thing is, especially with containers, is we can share resources inside of containers. With Proxmox, VMs can be a little bit more greedy. Proxmox has done a lot to make some sharing for them, and we're definitely seeing that in our experiences. But containers definitely share, and they share well. So, we're just going to give it some resources. I'm going to select DHCP here for myself. I'm changing my bridge. Now, if you really have a default setup, you don't need to do that. My server here, I have a separate VLAN inside my router that kind of isolates my VMs from my Proxmox system itself and from the rest of my network, which is segregated out onto a few other VLANs to necessarily control like our pings and different behaviors on the network. I don't want devices seeing devices and stuff. We do have a lot of IoT devices here in the house, and we enjoy them, especially our smart switches and the functionality they allow us to have with our house. But with that, I don't want them seeing my computer, and they can be a security risk. I think I seem to see a new update for those switches like every two weeks. I think it's kind of ridiculous, but I'd rather see the updates, to be honest with you, than not see the updates because the updates mean things are getting fixed. So anyways, I have my own VLAN for many of the reasons we've just discussed. I got to select that VLAN. The bridge is connected to a VLAN, and we use a single Ethernet port inside of our server here. So anyways, we're then going to select the DHCP, so my router is going to assign that, and we're going to hit **Next**. So I know we've done some unboxing. I do want to mention, while we're talking about networking, if you're interested in a network like mine, we have some videos on how to set something similar up in Proxmox. We did it during our budget build of our cluster at the Freedom House, and that's really awesome. It's not exactly the same as this setup down here; that's going to definitely be changing this year. What I do want to mention is I found some TP-Link ER605 from TP-Link, which is an absolutely amazing router as far as for the budget. I think it's 60 bucks for one of these. They handle gigabit throughput, and if you're trying to get into what I would consider its competitor, which is the pfSense router, that pfSense router is, I believe, 200 to the base level and doesn't even fully handle gigabit. So something to consider. It was a little bit different to configure, and it's definitely not as well documented as pfSense, I would say. pfSense is also open source, so you have some of your community support there with that open source. But we were able to pick up this ER605 for this house and then pair that with an EAP, I think it was 625 from TP-Link as well. That whole entire setup built out for 110 gave me gigabit level support, AX Wi-Fi. I think it was 13.50 or something; it wasn't the highest speed that I could get, but it was definitely more than I needed as far as Wi-Fi. And that access point also supported VLANs and virtual SSIDs for doing some of that segregation I required. No modification of firmware or anything else, and we do have an unboxing on both of them. I talked a little bit about setting them up. I think one was a blog post, and the other one was an actual unboxing video where I showed you some of that. Go ahead and check that out if you're at all interested. I think it's a really good cheap budget home lab build that allows a lot of functionality to your house without getting into those all-in-one routers that really control and limit you, but you do have to do more setup. So there is that. Anyways, back to our video at hand. We're going to go to **DNS** here, and we're going to press **Next**, and we're going to finish. So now that this container has finished, we've created the container. We can go ahead and find it up here, and it's called 114 in our case, and we're going to press **Start** and we're going to open our console. Now, I'm going to take a minute and adjust some screen recorder settings. You probably won't even see that message, but give me a second. So now that we've opened our console, we can go ahead and log in. The first thing we're going to need to do to log in is use the root user and the password that we set up during the creation of this container. Now, I'm going to get to setting up some users here in a minute. The first thing I always like to do whenever I start a new Linux distribution, especially Debian or Ubuntu or anything like that, is run `apt update`. This will update our repositories and find out if we have any software that needs to be upgraded. And it says we have 70 packages, so we're going to run `apt upgrade` and we're going to put a `-y` for yes, and now we're going to install all 70 packages on our Ubuntu system. So now our Ubuntu system's up to date. It's kind of like when you get a new Windows computer; you go to first do updates before you can really do anything else. Alright, so now it's time to create those users that we talked about. You'd notice the first two commands, if you're familiar with Linux and working with Raspberry Pis or whatnot, you notice that there was no `sudo`. `sudo` stands for super user do and basically gives you root or admin access over the Linux operating system. This is kind of a generality; it's not totally the truth, but it's a good way to think about it for a beginner. So, with that, you'll notice that we didn't use it, and we're going to use it here in a minute. The reason we didn't use it is we're actually logged in as the root user, and root users aren't generally available in most distributions, including Raspberry Pi OS. You have to go in and turn them on, and they're a big security risk, and that can be somewhat of a problem inside of a container. But it's quite easy to fix here. So let's go ahead and fix this. The first way we're going to fix this, since this is Ubuntu, is we're going to use `adduser`, and if you're kind of Debian familiar, you'd notice they use `useradd`. `adduser` is kind of a script-like version of `useradd`. It's similar. I find `adduser` maybe a little less clunky; it just things work a little bit smoother. It includes a little bit more, and then we're going to give it our username, and for us, it's going to be **ve**. We give it our new password twice, we answer all of these questions that doesn't need information about us, and we say yes, the information is correct. So now that we have a user called **ve**, we can go off and do anything, but that user would have no `sudo` rights or anything else. So what we can do to give that user `sudo` rights is use the same `adduser ve` command, but this time we're going to put `sudo` after over top of that, and you can see the command behaves differently, and it tells us the user **ve** was added to the group `sudo`. Unfortunately, if we were to try this prior to creating the user account, it would say there was no user or account, so it kind of notifies that there's another variable in there and adjusts the command that is actually performed. If you were doing this on Debian, you would have to use, I think it's `addgroup` or `adduser` and then the username and that. So that's why I kind of like this command a little bit better; it's just kind of a little bit more convenient feeling here. So now we don't have Docker installed. We're actually going to have to come back and run this command again after we install Docker. But the first, now you're probably asking, "Well, that's great; you've created a user, but the root user is gone on your system, so isn't that a security risk?" And yes, it is. So to deal with that, we're going to type `exit`, and that's going to log us out, and we're going to enter **ve** and our new password. Now we're going to have to start using `sudo`, so we're going to run `sudo passwd -l` which is going to remove the password and group. This is essentially going to remove all passwords from the root user, making the root user disabled and unable to log in. So now we have no more root user on this container; it's just going to say it doesn't exist, it's not available, and we're ready to start that installation. I'm going to take a minute, my time, a couple of minutes, my time—only a few seconds—and we'll be back for the next part of this video where we're going to install Docker and install Docker Compose. After that, we'll move on to another section where I'm going to walk you through creating the YAML file inside that Docker Compose uses to automate the process of making all of these images for every one of these different browsers. And again, it's Firefox, Chrome, Chromium, Tor Browser, and Edge, and they're all independent and separate. We're going to do some port things because as default, these containers all run on the same port, so we're going to do some port proxying inside of that Docker Compose. And then we'll go, and we're going to use Nginx to make a simple web page, and I'll explain to you why initially I'm not using any reverse proxies to maybe make accessing these easier. I'm just listing out a note of where everything is, and then finally, I'll do a demonstration of how to start it up, and we'll get everything up and running, and then I'll do a demonstration inside a web browser of accessing one of these web browsers and talk about a few more different things here, and that'll conclude the video. Alright, I'll be back in just a few seconds. ``` ```markdown And g-n-o-p-g, which is another repository-type software that I see fairly frequently, so I'm not super worried about it. So we then press **Enter** to do this installation. Since there was no `-y` at the end of it, it asks us if we really indeed want to do this install, and the answer is yes, we do. Now, to avoid some troubles, Docker has us create a new folder with the permissions of `755` in `/etc/apt/keyrings`, and we're going to do that with `mkdir`. So this is what we're doing, and we're again pressing **Enter**. Now we're going to use `curl` to download the GPG key file and place it in this folder. So now we need to actually take our repository. Now that we have the GPG key and we're validated to communicate with Docker, we need to edit a file, a `.deb` file that contains all of our package lists that our `update` command reads from, and we're going to just do that with `echo`. So this long string basically adds a list, kind of a smaller file to another document that tells us where we can get our repositories from. Okay, so we added a new repository. Now our repositories aren't up to date, so we're going to run `sudo`. And you can notice now that we did create that user account; just like we discussed, we're using `sudo` now. So we're going to run `sudo apt update`. I'm not going to run `apt-get`; I'm lazy, and I'm not going to type an extra four keys. And I'm going to run `update`, and you'll see that we had all packages up to date, and that's because we did that upgrade earlier. But we downloaded the contents of the `download.docker.com/linux/ubuntu` repository, and so we're able to now begin installing Docker. So with that, we're going to enter a line, and Docker is broken down into Docker CE, the Docker CLI, `container.io`, and a few extra plugins that we're going to acquire. And you can see we're also, by default here, now installing Docker Compose as part of that project, so we're not going to need to go do all the extra steps to install Docker Compose. Hopefully, let's find out. Again, we're going to `-y`, so the installation is finished. Docker should be on our system, but now if we were to enter `docker -v`, which is the command to get the version of Docker, well, it worked. Traditionally, we have to put `sudo` to do anything, and maybe they've made a few adjustments. But what we normally do to deal with that is we use that `adduser` command here. If I'm just pressing the up arrow and I'm scrolling through my old commands, I actually entered that command in the other user, so it'll work. So we're going to add user, and we're going to go `ve`, and now after this, we're going to put `docker`, just like we put `sudo` last time, and that's going to add this user to the Docker group. So again, `exit`, and then the `E` and password. Now, `id` and Docker shows us. So the first thing Docker suggests you do is to test the biz, to test the version. So we'll run `docker -v`. Okay, so I looked at the documentation a little bit more, and it's actually really... we've removed the dash between Docker and Compose. And then let's see what happens with `-v`. We actually get an error, but to know, hopefully some of our other commands haven't changed, and using the new version of Docker or Docker Compose doesn't affect us too much. If not, well, we probably should change. Alright, so we'll be back here in a minute, and we're going to look at `nano`, which is a text editor with the files. Then I'm going to show you how to use a tool called `scp` to push the files from my own operating system, or my work laptop—or actually personal, but my filming laptop—to this container. And then we're going to try to run them with Docker Compose with the new command. Should be interesting. Stay tuned! Alrighty, so inside of our Docker Compose file, our Docker Compose file is a YAML file, and here is a view of the inside of this file along with the two other files that we're going to be pushing up. Now, basically, most of this will run without those other files. We're going to have to remove this top note container that you're looking at here right under **services** if we don't have those files, but all of our other images are going to run and behave the same way. This notes file is an Nginx file, as you can see, and it's kind of just a web server that displays some information. So it goes, "Hey dummy, this is how you work with this." If since you've forgotten, you've found yourself at this page. Something I kind of wanted to do for myself—I bounce in and out of web development quite a bit, and with doing the e-stuff in the last couple of months, and with that being said, I necessarily am nervous that I'm going to forget how to interact with these. And there are great testing tools, and I plan to use this setup or something similar of a setup. I might tweak it a little bit more, and again, I'll bring you a video if I do, but I plan to use these containers in this setup for doing most of my testing of web development and not the other Chasm desktop infrastructure. Basically, due to the fact that I like to work lightweight, and that requires more resources, I feel it's going to be a great tool to have at home or at the Freedom House on my R710, where I have those resources to run. I got some cool ideas, including being able to make a pseudo VDI setup with Proxmox that I want to play around with. And if you'd like to see videos like that—and I'm not guaranteeing that video is going to be coming out; I definitely haven't tried; it's just an idea at this point—but if you'd like to see videos like that, consider clicking the notification bell, liking it, subscribing. It does really help this channel grow. So with that, let's look at the rest of this file. We can see that we have an image name; this is what the container is going to be called: **notes**. We're going to use the Nginx latest image there, and that's going to be on port 80, which is the default HTTP port. Then we're calling two volumes in. So essentially, this `./nginx/config` is coming in, and we're changing its name to the default config, which is the default configuration file for Nginx. Then we're going to pull in all the rest of the files from this directory, which the directory we're going to be using today is called **web browser**, and we're going to create that when we actually do the SCP itself. You can do this with `mkdir` and `nano`; you could copy and paste all this stuff in. In fact, the write-up that we will be using walks you through doing it that way because it's necessarily easier to do a write-off than that way than trying to tell you about all the finer things of using SCP. Generally, like we know where it's going, but there's a lot of things like I'd have to blank out the username, and you'd have to fill in your username and do this. So we can kind of copy and paste, and I don't know; I think it does... it's easier to walk you through doing it that way. Anyways, and we're going to touch upon these two files now. This file brings in everything; in our case, it's only going to be bringing over the Docker Compose YAML file and the `index.html` file that we... so again, not probably the best security; we probably should put `index.html` and put `index.html` at the end, but if I had images or other things I wanted to bring over, this simplifies it. Again, this isn't meant for the internet. So then we have Firefox, which again, you know, is a web browser, and we're pulling Chasm web Firefox version `1.113`. That's the Chasm version of that file. Quartz, this file operates on `9100`, and you can notice that every single one of these operates by default on `9100`. And although I looked, I did look, and I spent a few hours looking, I didn't find a way to either change the username or change the port if I did a Docker build now. I definitely might want to play with that in the future, but this got me all of the functionality I wanted, so I left it alone. But if you want something a little bit more custom, maybe you do. So we're going to use the Docker proxy to pass it to port `4000`. Didn't you notice we go `4000`, `4001`, `4002`, `4003`, `4004`, and `4005` as we work down this file for all these different browsers? This `shm_size` of `512` needs to be there in order for it to work, and we can indeed change this password. So this environment variable `VNC_PASSWORD=test` can be changed, so `test` doesn't have to be your password; it's the password I chose. So anyways, we did that; we filled out the same thing for Chromium, Brave, Tor Browser, Edge, and Chromium so that we have all of them available for us to use. Alright, so that's the Docker Compose file, and that's going to start all of these up when we run the Docker Compose. Now, if you wanted to, when you started this container, to have this entire cluster start up and run, there are ways that we can actually turn this into a service and have that happen. I haven't done that here because I didn't want that, but it is something that you can remember: you can turn this into a service and start all of this all at once. Here's our `index.html` file. Now, this is a lot of HTML here, and essentially I've given it a name so we can see in the tab what it is, and it's testing browsers. I gave the page a title, I outlined my username, I outlined my password, I put a reminder here that I needed to use HTTPS or it wasn't going to work, then I laid out the web browser and the port that each web browser is on. Real simple, no CSS, nothing; just a simple notes page for myself. And then here, this config file basically tells Nginx to host this on port 80 and to host `index.html`. Okay, so now we can go ahead and open up the terminal and look at what we need to know in order to upload this file. The first thing we actually need to know is the IP address of our container. Now, in order to do that, we're going to type `ip address`, and it's going to spit it out: `192.168.6.11`. So we can go ahead and fix... well, we're going to want this here in a minute. So let's push it over to the side, and now we're here. I blew this up nice and big; I talked about this creation before for you. But the first thing we want to do is `scp -r` because we're moving a directory. And since this is a Mac, I can go ahead and just copy this file and paste it here, and it's going to shortcut the directory to this file. Now, just like we were SSHing, we're going to put a username, the `@` symbol, and the address to the server. Now, great, but the server also needs to know where to put the file once it receives it. So we put a colon to tell it where, and we're going to enter `/home/ve`. So this is going to put this file in my home, and we can press **Enter**. And we get a nasty message in my case because I had a dyslexic moment and put `SPC` instead of `SCP`. We're going to accept the fingerprint and enter our user password, and you can see our three files from that folder were pushed onto our file. We're now actually done with the terminal, so we can exit this out, and hopefully, we can bring up the console now and run `ls`, and we can see that our **web browser** folder is here. Now, it's important that we `cd` into that folder. This opens up the folder, and we run `ls`, and we see our three files. Now we're going to run Docker Compose, and we learned that we now ran that command without the dash between the two of them. And we're going to run... now, whenever I run this type of thing for the first time, I like not to add a `-d` at the end of it because it gives me an output log so I can see kind of how things are behaving and if there are problems. So we're going ahead; we're pulling down all the parts of all of these images, and this will take a little. Now, once this is done, unless there's an update—which we didn't call the latest version; we called a version—this won't happen that way. But if, like, Nginx had a latest version come out, we would download that version, and we were running the command, it would download that version. Alright, so you should be seeing now kind of the startup process of all of these separate containers here and them communicating with the world and saying that they're alive and whatnot. So we're going to go ahead and go back to our desktop, and we're just going to move that to the side. Now, you saw like we added a good amount of resources here, and look, you can see with all of this starting up, well, this chatter, we're definitely using a lot of these resources here. Just a note now, we remember that we found out the IP address of our container was `192.168.6.11`, so we can go ahead, and here's that file that we created, that kind of notes file that told us. And we want to take note of this username; we weren't able to change it. You may have changed your password other than `test`, and let's go ahead and try to load Firefox, and that's port `4000`. So we're going to create a new tab, and we're going to write `https://192.168.6.11:4000`. This just says that we have a self-signed certificate; we don't need to worry about it; it's a far certificate, so we can proceed. We're going to enter our username and our password, and Chasm VNC starts up with Firefox. And you can see that our system here, we definitely pounded it a little hard. I didn't give it enough resources; I should have given that a little bit more resources, the third CPU and a little bit more memory definitely would have helped. But there's Firefox, and now that things are loaded, we should balance out here in a minute. We should be able to go to our web page. Alright, so the user experience is pretty bad here. Even with the two CPU cores and the over two gigs of RAM, that is the suggested minimum resource. You can see that we are indeed heading to YouTube, but this is not a usable web browser experience. Some of that just generally has to do with the fact that we're running, what, five separate web browsers, six separate web browsers here, all with the same container, and that's just not... But I want to show you that you can get a much better experience. I don't want to turn you away from this, so let's just go ahead and leave this stuff alone, head over here to Proxmox, and we're just going to open up our console window. I'm going to press **Ctrl + C**, which is going to abort, and it's going to turn off everything. So you notice all the containers stop, and we can kind of check this by running `docker ps`, and we can see that there is nothing running. Now, I'm going to use Proxmox, and I'm just going to stop this container; it's a video demo container, and you could definitely shut this down if you want. For the sake of speed, I'm going to stop it now. I'm going to go in, and I'm going to go to **Resources** in Proxmox. I'm going to give it the extra cores, and I'm also going to give it more RAM. Then I'm going to start it up, and most of the time our console doesn't come alive, so we'll close our console and we'll open a new one. We're going to log in, and this time we're going to run that same Docker Compose command, but where we stopped it, it's not available. So what we need to do is we need to go to `ls`, and we need to do that, and then we can run `docker-compose up -d`. This time, you can see everything fired up much faster, and this time we can run `docker ps`. You could see that all the separate containers are up and running, and if we expanded this window outwards—and I can drag it out, but it's not going to look great on my screen editor here—you can see that they kind of fall in line. Alright, so here's the web browser with it actually all working without that giant command window over top of it. So one thing that we do want to go ahead and make sure that I know is that outside of Chasm desktop, audio doesn't work, so you're not going to be able to stream audio. This is more meant for using separate web browsers to do some testing. Now, I do want to go here, and let's just try another one. So let's go to `192.168.6.11:4002`, and we notice again we get that same cert page, and we accept it. We're going to copy our Chasm username, and our password goes `test` again, and you can see it load up. And now we've switched from Firefox, and here's that copy and paste step I was just talking about. And we've switched from Firefox now to Brave, and we can go to the settings, and we can drop the quality. We can go to low, which is what I did last time; it kind of changes the resolution here, but it definitely makes things perform better. And we can go to YouTube because I think this is very taxing and showing if you're getting good video playback. That typo... and look at that! Inside of Brave browser, we're not even getting our channel. Go figure! So where we can't copy and paste, I'm going to stop so I don't get a content strike. But actually, I just saw one of my... check my videos here. Here's an old video, so you can see that again we're getting very good display. I definitely think this video would not show as well as maybe one of our new ones here, and we don't have audio. So with that, I hope you enjoyed our presentation. Are you finding use for a sandbox isolated browser, or are you using it for development like I am, so you don't need to have all of this extra stuff installed on your computer? As always, have a good night. ```
Залогинтесь, что бы оставить свой комментарий